UVM Test
UVM Test is a top level UVM component that “has a” Environment class and launches stimlus. It is created from uvm_component branch of a uvm class hierarchy. Below diagram is how a UVM test looks like. The reader can also treat this as a bird’s eye view of a UVM testbench setup. We will use a top down approach to explain what each of the UVM components do. In other words, we will first explain what test does, then environment, then agent and so on…
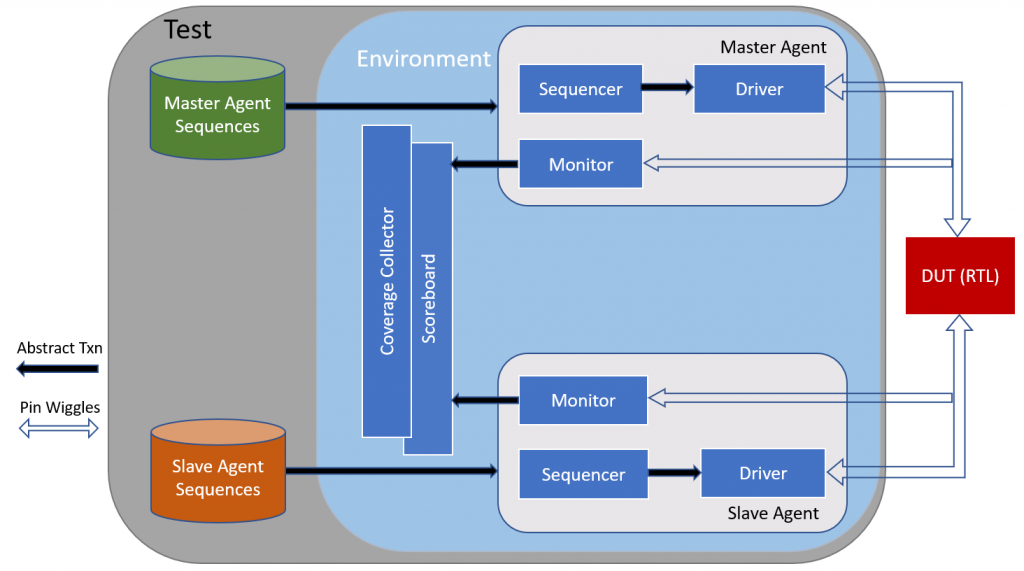
A test sets up the Environment and launches stimulus from associated Sequences which contains abstract transactions. tb_top program instantiates a test. A test “has a” environment class and sequences. In other words, a test instantiates the environment and creates object of a sequence. A UVM Environment instantiates Agents, Scoreboards and Coverage Collectors. In above diagram, two types of Agents are created Master Agent(Active) and a Slave Agent(Reactive). An Agent creates and consists of a Sequencer, Driver and a Monitor. A driver can be absent from an agent in cases when the agent is just passively monitoring the traffic on interface signals. Please note that tb_top instantiates a DUT. An Environment does not instantiate the DUT.
Sequencer in Master Agent takes the abstract transaction from Master Agent Sequence and passes it to Driver which convert these abstract transactions to Pin Wiggles of DUT. This way, the driver continues to drive the data on DUT interface. The monitor continues to look for any activity on the interface signals and converts the pin wiggles to abstract transactions and passes the abstract transaction to Scoreboard and Coverage Collector. Analysis ports and analysis FIFOs are used to connect and pass information (transactions) across different UVM components.
General guideline or recommendation is to create a base_test and then use it in each test by creating a new class in the test and the new class is extended from the base_test class.
Here is a typical code for a uvm test.
program test(tbintf io);
class adder_test extends uvm_test
`uvm_component_utils(adder_test)
env env_i;
add_sequence add_seq;
function new(string name= “”, uvm_component parent);
super.new(name,parent)
endfunction
function build(string name, uvm_component parent);
super.build(name,parent);
env_i=env::type_id::create(“env_i”, this);
//Set default sequence
set_config_string(“add_sequencer”,”default_sequence”,”add_sequence”);
endfunction
task run();
add_seq.start();
endtask
endclass;
initial begin
run_test(“TestAdderBase”); // OR Specify test name using +UVM_TESTNAME=TestAdderBase
end endprogram
In above code snippet, program test is defined and interface io is passed into the test. The reason why we have used program instead of a module because it is a recommended way of building a testbench in System Verilog(Yes – UVM uses System Verilog) and a program provides an entry point to execution of a testbench and a module is primarily used to represent a design block.
Inside test we have defined adder_test class that extends from uvm_test(Remember a class is just a blueprint for an object to be created. In other words, class is useless unless an object is created from it). After that `uvm_component_utils macro is used to register class adder_test into the factory. env_i is an instance(or handle) of env environment class and add_seq is an instance(handle) of type add_sequence. Then new function is defined with two arguments a string name and parent. super.new is used to call the parent class(In this case, it would be uvm_test). function build is then defined same way and env_i object is created using type_id::create standard UVM function.
After that, set_config_string declares the default sequence (add_sequence in this case) associated with the add_sequencer. Inside run task, add_seq sequence starts. This will start running default sequence i.e. add_sequence on add_sequencer. The driver will take the add_sequence (which will have series of abstractions) from sequencer and drive it on DUT pins. UVM backend source code automatically calls run() task after the start_of_simulation phase. You can either add the name of the test by calling run_test or pass it from the commandline using +UVM_TESTNAME.
It should be noted that UVM executes several phases in this order: build(), connect(), end_of_elaboration(), start_of_simulation(), run(), extract() check() and report(). Build() is executed in top-down fashion while connect is executed in bottom-up fashion. run() is a task that consumes time while all others are functions. I will write a separate post on UVM phases later to give more details on its significance.
So, in above section we looked at a typical uvm test block diagram containing different other uvm components and how these components interact with each other. Then, we looked at the code for uvm test and explained the code. In following sections, we will see all nitty gritty details about each of the blocks inside a uvm test.
To get notifications for our upcoming blogs and tutorials, please LIKE our facebook fan page