Concept of factory and UVM configuration
In this section we will learn about concept of UVM factory and UVM configuration. UVM factory is a database or a lookup table that stores user defined classes which are extended from UVM classes. UVM gives you ability to store pointers of the objects (from respective class definitions) that you have created in form of a factory. A UVM factory is nothing but an associated array of classes indexed by a string. Moreover, UVM requires each user defined class to be registered in the factory (i.e. in a class definition, the first thing verification engineer needs to do is register the class in the factory). Using factory, UVM source code remembers what all classes users created.
UVM factory gives mechanism to improve flexibility, scalability and reusability of the testbench by allowing the user to substitute an existing class object by any of its inherited child class objects. User can use “factory overriding” feature given by UVM to swap instances of an old class with instances of a new class. Refer to this diagram while reading this whole post to get a better understanding of a uvm factory.
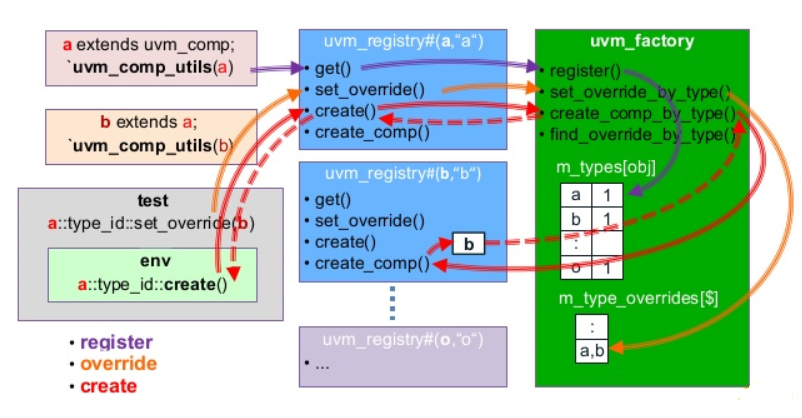
In order to register a class in factory, two macros are used:
- `uvm_component_utils: This macro registers classes names which are derived frm uvm_component base class.
- `uvm_object_utils: This macro register class names that are derived from uvm_transaction, uvm_sequence etc.
When object of a class (component class) is created, it should be created using the factory instead of new(). Here is an example:
class adder_test extends uvm_test;
adder_env env;
function void build_phase(uvm_phase phase);
env = adder_env::type_id::create(“env”, this);
endfunction: build_phase
endclass: adder_test
In order to understand concept of UVM factory and uvm configuration, let’s look at each piece of that one line that creates the object:
env = adder_env::type_id::create(“env”, this);
env is the handle to the component being constructed.
adder_env is the component’s class name.
type_id object is a singleton design pattern. Singleton design pattern is one of the design patterns used in Advanced level of Object Oriented Programming.
Create is a static method inside static type_id object. Two arguments that user needs to pass into the create method are a string and parent. In above example, we are passing “env” string, so in the factory the env object is indexed with “env” string. Second argument is parent. We are passing this which refers to current class in Object Oriented Programming. And in this case parent of env object is adder_test object because this refers to adder_test.
UVM gives you two factory methods to override existing objects in factory. These are:
- set_type_override()
- set_inst_override()
User can call above methods in build_phase function to override existing object with a new one. Also, a class can be overridden by its derived class only.
set_type_override() changes all instances of a class to a different class type.
Set_inst_override() changes specific instances of a class to a different class type.
The reason why we need overriding mechanism is re-usability. For example, you are working on a PCIE testbench for PCIE Gen3. In next project, you move to PCIE Gen4 and you now need to create a new driver but still want to use the testbench from PCIE Gen3 project. In this case, all you need to do is use factory overriding feature that would replace old driver with the new one and VOILA…you are ready to use existing testbench with all other components remaining the same.
Below is how you can print contents of a factory:
Use factory_print() function. It will pring out contents of the UVM factory and any factory overrides.
You can call factory_print() function in end_of_elaboration_phase.
function void end_of_elaboration_phase(uvm_phase phase)
uvm_factory factory;
factory = uvm_factory::get();
factory.print(1);
endfunction
Now, lets talk a little bit about UVM CONFIGURATION:
UVM gives you a central configuration database that allows components in higher level of hierarchy to configure variables in lower level components. It is useful when user wants to pass information across object hierarchy boundaries. Passing virtual interface pointer from tb_top to driver and monitor is a good example of configuration database use case. In tb_top(that instantiates test), user stores the virtual interface pointer using set function. The driver and monitor needs access to DUT interface signals which it can get using virtual interface pointer. To get virtual interface pointer, it uses get function.
Syntax:
uvm_config_db #(<type>)::set(<context>,”<instance>”,<field_name>,<value>);
uvm_config_db #(<type>)::get(<context>,”<instance>”,<field_name>,<variable>);
<context> – a handle to a class object or NULL. While setting in tb_top, set it to NULL.
<instance> – name of class object or empty string. Here, specify at which hierarchy level you want to access the variable being set. For example, while setting vif in tb_top, set it to probably *usb_agent*, so that it can be accessed at hierarcy levels that have *usb_agent* in their path OR just use wildcard “*” so vif can be accessed at any level of component hierarchy.
Example:
In tb_top module:
test_if ifc (….);
uvm_config_db #(virtual test_if)::set(NULL,”*”,”tb_vif”,ifc);
In build of driver:
virtual test_if vif; uvm_config_db #( virtual test_if)::get(this, ” ”, “tb_vif”, vif);
In this section, we learned about UVM factory concepts and UVM configuration. In the next section, we will learn about Transactions and Sequences in UVM.
To get notifications for our upcoming blogs and tutorials, please LIKE our facebook fan page