UVM Sequencer and Driver
In last few sections, we looked at how a UVM test instantiates UVM environment and starts stimulus and learned about concept of factory and configuration database, Transactions and Sequences in UVM, UVM Environment with corresponding UVM code and its explanation. In this section, we will look in detail about UVM Sequencer and Driver and what role do they play in a UVM testbench.
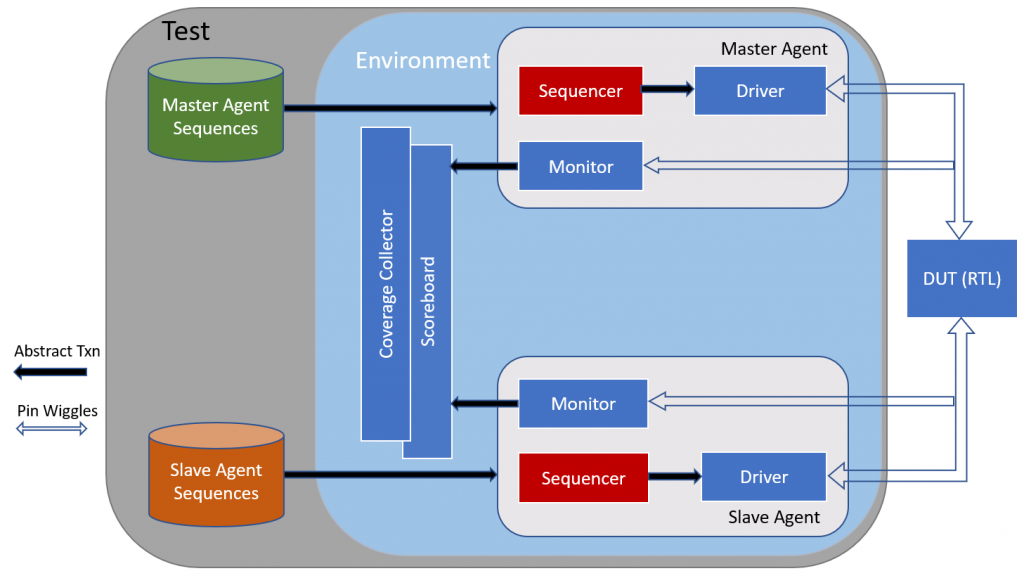
As mentioned earlier, an agent contains a UVM sequencer and driver. Let’s look at a sequencer and a driver one by one:
Sequencer: A UVM sequencer routes a sequence to the driver. It provides arbitration to different sequences that needs to be run on a DUT with the help of a driver. A sequence is a series of transactions. Sequencer and driver uses TLM Interface to communicate transactions.
Below is a UVM code for a sequencer:
class add_sequencer extends uvm_sequencer (#packet_c);
`uvm_component_utils(add_sequencer)
function new(string name =””, uvm_component parent);
super.new(name,parent);
endfunction
function build();
super.build();
endfunction
endclass
In above code, we are defining a sequence named add_sequencer by extending it from uvm base class uvm_sequencer and specifying transaction type associated with this sequence by passing packet_c. Then we register the sequencer with factory using macro uvm_component_utils. After that, same as other uvm components, we define function new and build. There is nothing alot to be done in a sequencer code. UVM source code takes care of majority of the things for us.
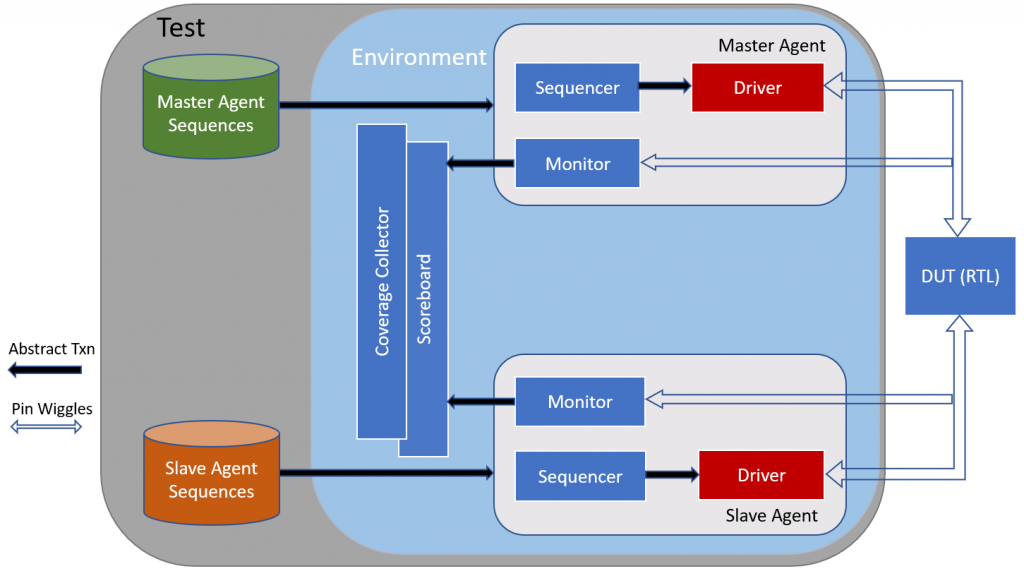
Driver: A driver converts abstract transactions to Pin Wiggles(Pin activations of the DUT). It drives the data on RTL interface. A driver is also sometimes referred to as a Transactor. A driver needs access to virtual interface in order to drive the data on DUT and it needs mechanism(TLM port) to pass the transactions that it is driving on DUT to the scoreboard. A monitor can also pass the information to scoreboard. Lets look at code how to do that.
Below is a sample code snippet for a UVM driver:
class add_driver extends uvm_driver #(packet_c);
`uvm_component_utils(add_driver)
uvm_analysis_port #(packet_c) drv_ap;
function new();
super.new();
drv_ap = new(“drv_ap”);
endfunction
function build();
super.build();
uvm_config_db #(virtual tb_intf)::get(this,””,”vif”,vif);
endfunction
task run();
fork
drive_data();
join
endtask
task drive_data();
packet_c txn;
txn = packet_c::type_id::create(“packet_c”, this);
seq_item_port.get_next_item(txn);
@(posedge vif.cb.ready)
repeat(5) @(posedge vif.cb.clk)
@(posedge vif.cb.clk)
vif.cb.a <= txn.a;
vif.cb.b <= txn.b;
seq_item_port.item_done();
txn.result <= txn.a + txn.b;
drv_ap.put(txn);
endtask endclass
In above code, add_driver is a user defined driver class that extends from uvm_driver. In other words, addr_driver is a child class of uvm_driver. Since uvm_driver is a parameterized class, we need to pass packet_c parameter to associate the type of transaction with this driver. Next line registers add_driver class into the uvm factory. And, then we declare an analysis port drv_ap. This is a TLM port that will be used to pass the transactions (that are sent to the DUT) to the scoreboard and scoreboard will store these transactions as expected transactions. Essentially, as soon as a transaction is driven into the DUT, it will be passed into the scoreboard. Please note, we could do this from a monitor as well. The reason why I am doing it here is just to give an example of how we can customize testbench as per our needs like I mentioned in the uvm introduction post.
Like we have been doing in other components, we define new() and build() function. In new function, we create the analysis port drv_ap. A driver needs access to virtual interface so that it can drive the data on DUT pins, so it retrieves the handle to virtual interface from config database using get API inside the build() function. A virtual interface is nothing but pointer to an interface. Please refer to any system verilog tutorial to learn more about virtual interface. In run() task, we just fork off another task drive_data() which will continue to look for transactions from sequencer and drive them on DUT.
Inside drive_data() function, we declare a transaction object of type packet_c and name it txn. We create it using factory’s create method. And then we call seq_item_port.get_next_item(txn). seq_item_port is an inbuild analysis FIFO given free by UVM. You just need to use it. get_next_item is a blocking method. it gets blocked until start_item(txn) is called by `uvm_do macro. Once the sequencer sends the transaction to driver, the handle of the transaction is copied over to txn object and get_item_item unblocks and program moves to next line. Now that the driver has a transaction, it waits for a ready signal to get asserted. You can think of ready signal as an output from DUT that indicates when DUT is ready to consume a transaction. So, on seeing a positive edge on ready signal, we wait for 5 clocks and then drive data. if you note, ready is accessed as vif.cb.ready. vif is virtual interface and cb is clocking block declared in the interface. Clocking blocks are used to resolve race conditions between a DUT and TB in system verilog.
After waiting for 5 clocks, we drive the data on next positive edge of the clock. On left we have a vitual interface signals and on right side of assignment we have variables from the transaction txn of type packet_c. Please note that we have used non-blocking assignments to drive the data. Once we drive the data, we call seq_item_port.item_done(). This unblocks finish_item() which is part of `uvm_do macro.
Then we calculate result or the expected data. Expected data or result is sum of a and b in case of an adder. After calculating expected data, we pass this information in form of txn to the scoreboard by calling drv_ap.put(txn). When scoreboard receives this transaction, it can store it in its expected queue and once scoreboard gets actual data from the monitor(monitor is continuously snooping DUT output pins and passing data to scoreboard in form of actual data), it can pop the transaction from expected queue, compare the transaction that it got from monitor and if both the transactions do not match, the TB can flag an error.
In this section, we looked at uvm sequencer and a uvm driver and how a driver drives the data on DUT pins and passes the information to the scoreboard with the help of TLM ports. In subsequent sections, we will learn about uvm monitors, agents, scoreboards, coverage collectors and various other key concepts of UVM.
To get notifications for our upcoming blogs and tutorials, please LIKE our facebook fan page