Introduction: What is UVM ?
This section is an introduction to UVM and we will soon know what is UVM and its key features. UVM is a Standard Verification Methodology which uses System Verilog constructs based on which a fully functional testbench can be built to verify functional correctness of Design Under Test(DUT). It is an IEEE standard/methodology based on System Verilog language. UVM is based on OVM plus key features from VMM and TLM(by Open SystemC Initiative).
UVM stands for Universal Verification Methodology and was created by an organization called “Accellera”. User can download UVM UserGuide by Acellera here and UVM source code can be downloaded from Acellera website. It has been jointly defined by Synopsys, Mentor Graphics, Cadence and end users. One can think of UVM as a pre-defined verification testbench architecture which is re-usable, scalable and configurable.
UVM is an open source code that provides:
- A library of base classes for building testbench components (Agent, Sequencer, Driver, Monitor, Scoreboards, Environment class etc)
- A factory for constructing objects and substituting objects
- Verification phases for synchronizing concurrent processes
- A reporting mechanism for a consistent way of printing and logging results
- Transaction Level Modeling (TLM) for communication between verification components
- Macros to semi-automate generation of required UVM code.
I think above information is sufficient to get introduction to UVM and know what is UVM but I would like to give readers a little more information to appreciate it. UVM utilizes System Verilog and Object Oriented Programming which uses Class, Objects, Inheritance, Polymorphism concepts. The “is a” and “has a” object relationships must be understood before diving deep in UVM:
- “Is a” describes inheritance relationship. For example in below diagram uvm_test class extends from uvm_component class. So, uvm_test class gets all the properties (member functions and variables) of uvm_component and on top of that it has its own properties. And, we can say uvm_test “is a” uvm_component.
- “has a” describes “object container” relationship. For example: A uvm_test instantiates uvm_environment class, which means uvm_test contains uvm_environment or in other words uvm_test “has a” uvm_environment object. Similarly, An environment class “has a” Scoreboard, Coverage Collector and an agent class. Casting is another system verilog concept that should be understood.
UVM Class hierarchy: Below is how class hierarchy in UVM looks like. These are standard uvm base classes that user will use to define their own classes to create a UVM testbench.
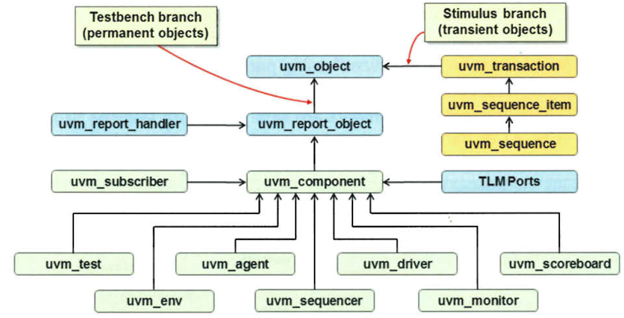
There are two main child classes of uvm_object (parent) class:
- uvm_component(testbench branch): This class provides base classes for different testbench components(Test, Environment, Agent, Sequencer, Driver, Monitor etc). Users can extend these base classes, add more functionality (member functions and variables) as per their needs. The objects created by these classes are constructed at beginning of simulation and remain throughout the simulation.
- uvm_transaction(stimulus branch): This class provides base classes for different stimulus related classes. The objects created by these classes are temporary – they are constructed during simulation when needed and thrown away when no longer needed. UVM does it behind the curtain, user doesn’t have to worry about garbage cleaning. When writing your code(user defined class) for a transaction item or any stimulus, do not extend from uvm_transaction base class as it is deprecated. Instead, use uvm_sequence_item.
Although UVM architecture is pre-defined, it is highly customizable. User has some freedom to use the components as per the needs of the project just like how a kid would play with a Lego building blocks. For example, as per standard UVM TB architecture, agent should be instantiated inside environment and agent contains driver, monitor and sequencer. But user is free to instantiate driver, monitor and sequencer directly inside the UVM environment skipping agent instantiation. User can also play with analysis ports and analysis FIFOs as per project needs (- See example of this in Driver tutorial). We will discuss Analysis Ports and Analysis FIFOs in upcoming blogs.
So, we just saw the introduction to UVM and explained what is UVM in detail. Let’s get started with nitty gritty details of UVM and look at the uvm test in our next section.
To get notifications for our upcoming blogs and tutorials, please LIKE our facebook fan page